For this group assessment, I had to assist in producing a short movie containing visual effects and filmic language among other qualities. We are all chosen and assigned primary and secondary roles, my own roles are character modelling and visual effects artist. We had decided to produce a short movie of a man who finds a pair of advanced sunglasses and is drawn into an alternate reality where he is menaced by robots.
We all produced our own storyboards to see how the entire scene would go. Below is a set of image files of my own original storyboards, although we have now chosen the final stage/story line.
Saturday, 28 January 2012
Sunday, 22 January 2012
Pre-Production - Planning Stage
Lighting Tests
As we are going to produce a film where CGI (computer generated imagery) blends with live action, we have to learn and figure out methods on how to make CGI and visual effects involved photorealistic. We started off by experimenting with lighting. We set up our own spotlights during a session and got our chosen actor/model to pose as we tried different types of lighting that we felt would be good for the cinematography in our film.
Lighting Test in Maya
After the lighting test was complete, I decided to replicate the light in Maya 2012. TO do that, I started by creating a polygonal plane in order to import the photograph into the scene. I then assigned a new lambert material to the object and then connected the photograph to the colour section and activated the Hardware Texturing node. The rest of the scene was developed in this order.
Then I created a polygonal sphere to use in the scene. But for this object, I decided to create a glass shader to make it more interesting, and also to experiment on making the object realistic for future reference. T create the glass shader, I assigned a new phong material (you could use either blinn or phong for illumination surfaces but I normally use phong.)
Then to make the shader more effective, I went into Hypershade box (Window - Rendering Editors - Hypershade) and assigned a Remap Value and Sampler Info node. This helps to programme the stimulation of a specific part of the texture, to make it appear more glass like in this case. I connected the Sampler Info node to the Remap Value by middle mouse button dragging it on top of the Remap Value then connecting it as shown in the image. When that was done, I middle dragged the Remap Value to the Transparency and Reflectivity sections of the phong material and then used the Remap Value options to tune the apperance of the texture material to make it look more like glass.
 |
As shown in the image, I used the Utility Sample node in the Remap Value box to enchance the stimulation of the glass shader. |
To further enhance the glass stimulation, I went into the Render Settings box, set the Quality to Production and then altered the Raytracing option. I turned down the Max Trace Depth to 10 to make it even with the Reflections and Refractions options.
This image shows the layout of the spotlights I had placed in the scene, approximately accurate to the lighting diagram shown earlier. I duplicated the spotlights, set them up and then changed the colour, direction and intensity of each one to replicate the lighting in the original photograph, to make it blend in more.
 |
A rendered image of the final version of the scene, showing how the lighting affects the object and is almost accurate to the lighting in the photograph. |
Concept Designs - The Robot
Below is a series of images of my own designs and experimentation for the robot. I attempted to use my own methods of lighting and texture to the components that I had developed in Maya so far.
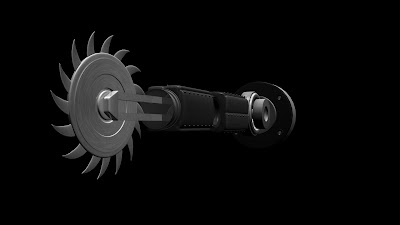
Below are a series of images of one of my own designs/concepts for the robot, an arm with a sawblade in replacment of a hand. The entire arm is of course constructed using basic polygonal shapes such as cubes, spheres and cylinders and each shape is applied a specific material, but most contain the same JPEG image file of a brushed silver metal I had developed in Photoshop long ago. The red wire in the first image, I attempted to add an nCloth node in order to make it move and bend like a wire whenever the arm was animated. Did not have the effect I expected but will find a more sufficient method later on.
The final design for the robot is complete, so on we go to the modelling stage.
Friday, 20 January 2012
Production - Modelling the Robot
My primary role in this assessment is modelling, so I had to model the final design of the robot from scratch based on the original JPEG images, using them for guidance.
To start the modelling progress, I had to import the robot designs to use as reference. Can't really create a robot without blueprints, so to do that I just produced several polygonal planes, assigned separate textures to them and assigned each JPEG image of the robot designs to those textures and lined them up accurately.
Most of the robot is built from basics shapes, I mainly used polygonal cubes to construct the entire model. To do that, I had to use subdivision surfaces and modify vertices (points where edges intertwine) into the approximate shape of the design. I started off with the head and then added extra features (other parts) to make it look more mechanical. The only spherical polygonal shape I used was for the eye and I duplicated the shape and modified it for an eyelid.
Another cube is used, modelled and duplicated to produce the upper body of the robot. Of course, I had to use the extrude tool to achieve more shape in the structure.
Once I constructed all the components for the upper body and head, I moved on to the arms, legs and lower body. Mainly composed of cubes, for certain parts that could not be built from simple shapes alone, I used the Create Polygon tool, Cut Polygons tool, the Extrude tool and Insert Edge Loop tool. Rather than just having sharp edges for the shapes, I made sure that there were enough subdivision surfaces to have a more of a smooth quality to the structure. I started on making a left arm and leg and then duplicated it and set the scale to negative, (meaning it would face the other way, similar to a mirror effect) thus creating a right arm and leg.
 |
| An image taken from each side of the robot. |
Once every part of the robot model was complete, I made sure to parent certain components to the appropriate parts of the model to approximate human like anatomy. Then I assigned a new material mode to the entire model, a phong (Phong shading) so it would have more of a shiny reflective surface.
A movie clip of a turntable animation of the final model of the robot.
 |
| Texture map that I produced in Photoshop to use for experimentation. |
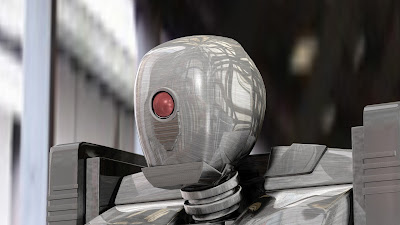 |
| Shot of the robot using Image Based Lighting, where you can use an environment map and emit light from that, can be used for photorealistic lighting and texturing. |
Thursday, 19 January 2012
Production - After Effects Assets
My secondary role was producing additional visual effects, I mainly used the programs Adobe After Effects CS3 and Photoshop to accomplish all this. As science fiction was involved in the plot, I did research on certain elements that were relevant to the genre and began using a collection of techniques and methods to develop some desired effects, such as using wireframe grids and holographic transitions to create a virtual reality simulation from one live action movie clip to another.
FIRE TESTS
Below are a few screen shot images of simulating fire as a possible effect for the film. Unfortunately this effect was never used in the final movie but it is here for you to see. Once again, used After Effects to accomplish this effect and the fire animation preset is of my own design. Had to look at several images of fire for reference so I could achieve as close as possible the look of realistic fire.
I achieved this by using a combination of a particle system, several glow effects and some color key and vector blur nodes to make it look like fire. I've actually added a tutorial on how to produce this animation preset in a later post, originally I was going to put on as a PDF file but since I did not have the patience, I've put it on this blog in a separate post instead, be sure to look out for it.
 |
| Same fire effect but with some smoke added. Once again used the Particle System with same blur effects in a separate solid object and then placed it behind the fire clip. |
 |
| Screenshot of a blazing fire outside the elevator door. Only this image remains as this shot was never completed. |
Final version of the fire/smoke test, sadly it was never used in the final movie but might be used for future productions.
S.P.E.C.S TEST
I used camera tracking for this particular shot to add a separate effects composition to the sunglasses.
Final version of the s.p.e.c.s test with sound FX mixed with original audio.
"DIGITIZATION" TESTING - LEVELS 0 & 4
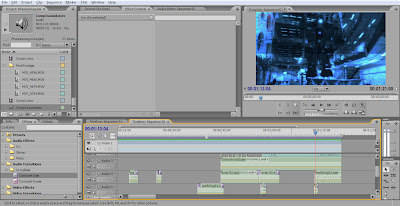
One major effect that was used was what I like to call "digitization." The sunglasses had to make the character go from a green screen studio room to an elevator but we had to make it look good and one transition that I developed was what is known as "digitization." Basically a wireframe grid of the elevator would appear and then the green screen would transition into that of the actual elevator and then the wireframe grid dissipates away.
The way I went about doing that was to create the actual grid by using several 3D layers with grid effect presets assigned to them, once again using the actual film footage for reference, using a few glow effects to make it more interesting. Then to blend the grid more, I had to make it move with the footage, to do that I used a camera tracking technique.
Assigned a motion tracker to a particular point of the footage that would easy for the tracker to follow and then analyzed (played the footage) so that the tracker would focus on that point and set key frames for each frame of a second.
Then I added a null object and edited it as a target so that the motion key frames would be transferred to that object. Then I parent the grid object to the null object and when that was done, the wireframe grid moved with the footage so it looked as though it was actually being filmed.
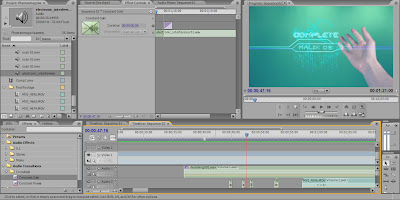
Here is a video test of the first digitzation stage, beginning with level 0 (the floor of the building). Added some more elements to make it look a bit more interesting and added some rough sound effects to accompany it.
 |
| Imported the Photoshop file of the grid into AE and did some modifications such as glow effects and beam. |
 |
| Producing transition of one movie clip to another with the grid in effect. |
The final version of the second digitization test, with audio.
OTHER TESTS
Below are some more visual effects that never made it into the final version of the movie. While some robots have to fire ammunition at the character, I attempted to create a sort of raygun effect based on some reference from other sci fi movies. Achieved this using a radio waves node, simply altered the controls and frequency so that they would move from the center of the screen to the left side and then added a glow effect as well as a beam of light for extra effect.
First ray gun test using radio waves with glow and light effects a beam of light and lens flare to accompany it.
Same effect, but with a blue flame preset added, based on the other animation preset I mentioned earlier, only with the colour changed.
This here is a rendered rough test of a robot attacking our main character, with both effects added. Had to added some lighting effects to enhance the scene.
Wednesday, 18 January 2012
How to Create Realistic Fire - Adobe After Effects CS3.
This is my own tutorial that I mentioned in the previous post on how I made realistic looking fire using a particle system in After Effects CS3. Of course, you can also do in in later versions of AE but personally I think the "old ones are the best ones."
Of course, you'll need a solid to apply the effects to so go to Layer > New > Solid. Don't worry about changing the colour cause it won't show anyway by the time we're done.
Then go to Effect > Simulation > Particle World or Particle Systems. You can use either one of these but if you want to create fire for 3D or live action purposes, then Particle World provides more functionality.
Now follow these steps to use the Particle World/Systems. You can play around with the controls to get the desired amount of fire but for this tutorial we'll start off with a simple flame.
1. Change Birth Rate to 0.3. (Birth Rate affects the amount of particles expelled per second.)
2. Change Longevity to 2.0. (The particles will stay on screen for 2 seconds before dissipating.)
3. Under Producer, change Radius X to 4.0 and Radius Y to 1.0.
4. Under Physics, click on button saying Explosive beside the word Animation and change that to Fire.
That's it for the Particles. Leave all the other controls the way they are. Place your marker across the timeline a little to see the particles in action and they should look like this.
1. Change "Glow Based On" to Alpha Channel.
2. Set Glow Threshold to 37.6%
3. Set Glow Radius to 5.0
4. Set Glow Intensity to 2.8
That's it for the first glow effect. Simple, really. But we're not using just one, we'll be using several glow effects to get the particles to look like fire. So let's do the second one.
Once again, Effect > Stylize > Glow
1. Change "Glow Based On" to Alpha Channel.
2. Set Glow Threshold to 14.1%
3. Set Glow Radius to 9.0
4. Set Glow Intensity to 0.4
Ok, now we will alter the exposure a bit.
Effect > Color Correction > Levels. You could use Curves if you want but for first timers, it would be a little complicated.
Set the controls as shown in the image below and your fire should look the same as it is on the right.
If you're there, then great. Now we will add some appropriate colour to the particles.
Effect > Color Correction > Colorama.
Now click on Output Cycle, then click on Preset Palette, scroll down and select Fire.
Good, now when we do more glow and blur effects, the colorama will generate those colours based on the tone and shading of the fire.
Okay, now we will add a special kind of blur effect that will make the particle kind of ridge and swirl.
Effect > Blur & Sharpen > CC Vector Blur.
1. Set the Amount to 18.0
2. Set Angle Offset to 0x +85.0 degrees.
That's pretty much it, although you can play around with it if you wish. Your fire should now look like in the image below.
Right, now we simply add another blur effect.
Effect > Blur & Sharpen > Fast Blur.
Simply set the Bluriness to 4.0.
Now we add another two glow effects.
Once again, Go to Effect > Stylize > Glow
1. Leave "Glow Based On" at Color Channels.
2. Set Glow Threshold to 60.0%
3. Set Glow Radius to 29.0
4. Set Glow Intensity to 0.6
Apply the glow effect again.
1. Leave "Glow Based On" at Color Channels.
2. Set Glow Threshold to 6.3%
3. Set Glow Radius to 30.0
4. Set Glow Intensity to 0.4.
Your fire should now look like this. Almost there, just need to add a few more effects.
Go to Effect > Keying > Color Key.
The purpose of this is to clean up our fire and get rid of certain particles on the outside that do not go well.
1. Set Color Key to Black. Use the Eyedropper symbol or simply click on the colour to set up the palette box and change it to black.
2. Set Color Tolerance to 150.
3. Set Edge Thin to 1.
4. Set Edge Feather to 10.5.
Okay, now we add just one more glow effect.
On last time, Go to Effect > Stylize > Glow
1. Leave "Glow Based On" at Color Channels.
2. Set Glow Threshold to 60.0%
3. Set Glow Radius to 32.0
4. Set Glow Intensity to 0.6
Now you've finished creating your fire and if it looks the same as it does in the image below, then you've done it! Now you can just change the setting in the particle system to get the desired amount of fire that you wish to have. Remember to increase Birth Rate whenever you increase the Radius X & Y. Otherwise the particles will just look silly.
That concludes this tutorial, hope you enjoyed it and now you can create really good fire for visual effects. Oh, one other thing, to make sure that you don't waste time doing the whole thing again whenever you want to create fire, select all modes in left side by clicking on Particles and then Shift-click on Glow 6 and then go to Animation > Save Animation Preset. Then just type in the name that you wish to call it and press Ok. It is now saved so whenever you want to use it, you'll find it in the Effects & Presets box which should be located on right side of screen. Well done.
Tuesday, 17 January 2012
Sound Design & Production
Of course, another key element to any storytelling is of course, sound as it does help to enhance the story as well as music. While all the main visual shots were being rendered, I took on the role of sound designer and began recording and collection a library of sound effects that we possibly might use to accompany the visual effects. I mostly recorded a variety of electronic sounds such as blips, beeps, distortion and humming for the glasses. There were some sound effects that needed to be altered or fixed and I achieved all of this by using Adobe Soundbooth CS3.
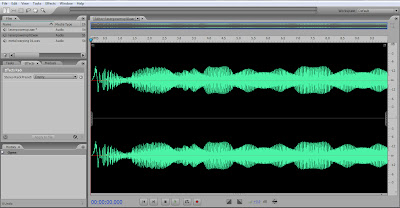 |
| A screenshot of one of the audio files shown in waveform mode being cleaned, trimmed and altered to sound better. |
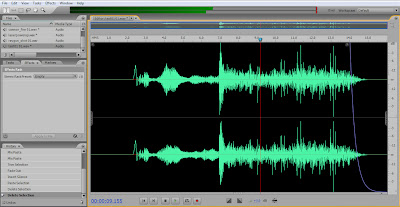 |
| Also another way to make sound effects blend more was to apply a fade in/fade out node as shown by the curved line on the right side of the image. As the line lowers, so does the volume. |
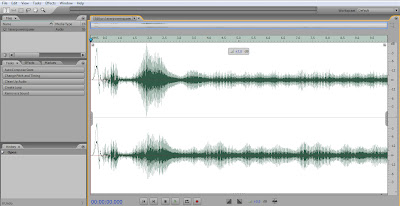 |
| Here, I am simply increasing the volume of one of the audio clips. Some audio can be too quiet or loud, so changing the amplitude helped a lot. |
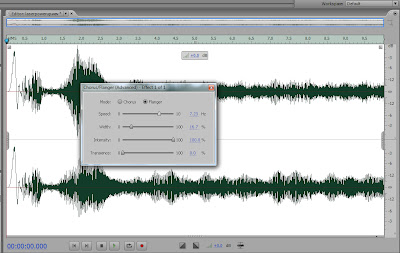 |
| A screen shot of me altering a sound file by applying a Flanger/Chorus node which will make the audio sound more electronic with a distorted warbling effect. |
Below are a variety of sound effects that I picked specifically for the production, feel free to listen to them.
Subscribe to:
Comments (Atom)


